Pages

Saturday, March 30, 2013

Potato Hash Egg Nests

Just in time for Easter.......

Of course, I couldn't wait until Sunday to make them, I had to try them out today the day before. So for Easter we may be having some sort of Strata instead-oopsie.

I saw Pioneer Woman's take on these last weekend and decided to try my own version. 

The whole family loved them.

And bonus....these are Vegetarian friendly and Gluten free!!!


This recipe is adapted from The Pioneer Woman


Ingredients:
4-5 large russet potatoes
1tsp salt and pepper
6 eggs


Directions:
  1. Preheat oven to 425F.
  2. In a pan large enough to hold the potatoes, cover with water an inch above the potatoes. 
  3. Bring to a low boil and cook until almost tender about 18-20 minutes. 
  4. Cover and set aside for 30 minutes, then drain until cool enough to peel.
  5. Shred using a hand grater.
  6. Sprinkle with salt and pepper, and toss gently to distribute seasoning.
  7. Spray a large 6 cup muffin tin with non stick spray.
  8. Mound 1/2 cup or more potatoes in each well and gently spread out and up the sides, slightly spilling outside is okay. Don't compact the potatoes. Spray lightly with cooking spray.
  9. Place in the preheated oven and bake about 20 minutes until slightly browned. 
  10. Take out of the oven and crack an egg into each cup. Reduce the oven temp to 400F. 
  11. Place muffin tin back in the oven for approximately 9-10 minutes for a set white and creamy yolk or longer if you like your eggs more set.
  12.  Season with more salt and pepper if desired. 

**This recipe is shared with:
Love Bakes Good Cakes 
 Busy Monday
Recipe Sharing Monday
Made By You Monday

Mop It Up Monday
Open Call Social
Mix it up Monday @ Flour Me with Love
Mealtime Monday @ Couponing and Cooking
Melt in Your Mouth Monday @ Make Ahead Meals for Busy Moms
My Meatless Mondays @ My Sweet and Savory
All My Bloggy Friends @ Love Bakes Good Cakes

Friday, March 29, 2013

Simple Creamy Potato Soup


Finally....it's warming up a little here. High's in the 40's-woohoo!

But with the change in weather comes the inevitable...colds and the flu going around again. 

Our youngest daughter woke up the other day with flu symptoms. Let's just say that I am glad she is now 15 and can make it to the bathroom. :/

It took a good 36 hours before I was able to coax her into eating again and that evening I came home and made a pot of this simple, yet hearty and delicious soup. It is one of her favorites. 

After prepping the mirepoix; carrots, onions, and celery, just cube some potatoes. I love to use gold potatoes. 


It's fast, creamy, you can add cheese and make it a Cheesy Potato soup. It's just so good.

Ingredients:
1 tbsp oil
4 tbsp butter
2 tbsp flour
1 cup diced onion
1 cup diced celery
2 cups diced carrots-we like carrots
3 cups cubed potatoes
1 quart chicken stock
2 cups water
1 cup whole mild or half and half
3 tbsp flour
salt and pepper to taste
shredded cheese-opt. 

Directions:
  1. Bring a large pot to medium heat and melt the butter and oil. 
  2. Add in the carrots, onions and celery and stir and cook until softened, about 5 minutes. 
  3. Sprinkle in 2 tbsp of flour and cook for about 2 minutes.
  4. Pour in the chicken stock and water and stir and scrape to combine.  Bring to a slow boil.
  5. Cover and lower heat to medium low and cook for about 18-20 minutes, until the potatoes and carrots are tender (I like some of the potatoes to almost fall apart, this helps to thicken the soup).
  6. Meanwhile, whisk the milk and flour until thoroughly combined, add to the soup and  stir. Taste and add salt and pepper.
  7. Continue to heat on medium low, don't bring back to a boil, until soup is thickened and creamy.
  8. Serve with cheese, or crumbled bacon, we like to use oyster crackers. 

Wednesday, March 27, 2013

Old Chicago Deep Dish Pizza


The other day I was craving a pizza, but not just any pizza, a deep dish pizza like the kind that Chicago is famous for.
With a nice chewy crust and loads of topping, all covered in a gooey cheese.

Yeah, so I knew I would only be able to have one piece....that's okay, one piece of this deep dish pie is enough.
What makes this such an awesome pie is making it in a big ol' cast iron skillet. If you don't have one at least 12" or bigger, this amount of dough can make 2 pies!

@Salted Nuts


See that dough, tender and chewy, and all the toppings and cheese-Yum!

This dough is awesome too. It came out perfectly! I whipped it up on my lunch hour and when I got home after work, it had risen beautifully-and my yeast had expired 4 months ago-yikes!

Ingredients:

(Dough)
1 pkt. yeast
2 tsp sugar
1 1/8 cup hot water (between 110-115F)
3 cups of all purpose flour
1 tsp salt
1/2 cup corn or vegetable oil

(Toppings)
Pizza sauce or a 14 oz. can of whole tomatoes, drained and crushed and then season with Italian seasoning. 
Cooked, crumble sausage
Pepperoni
Diced Ham
Olives
Mushrooms
Onion
Cheese
whatever you like on a pizza!

Directions:
  1. Dissolve yeast and sugar in warm water in a bowl. Let stand for 5 to 10 minutes until the yeast softens and begins to form a creamy foam.
  2. Combine yeast mixture, flour, corn oil, and salt in a large stand mixer with a hook attachment; knead until dough holds together but is still slightly sticky, about 2 minutes.
  3. Form dough into a ball and transfer to a buttered bowl, turning to coat. Cover bowl with a towel and allow dough to rise at room temperature until double in size, 6 hours.
  4. Preheat oven to 400 degrees F (200 degrees C). Grease a 12-inch cast iron skillet with 2 tablespoons oil.
  5. Press dough into and up the sides of the prepared skillet. Poke holes in dough with a fork to prevent air bubbles. Spread pizza sauce around the base of the crust. Sprinkle 1/3 cup of cheese over sauce; add layer of sausage and/or the pepperoni over cheese. Add another 1/3 cup  of cheese. Repeat the layers of meat. Top with remaining 1/3 cup cheese.
  6. Bake in preheated oven on the bottom rack until crust is golden brown, about 25-30 minutes. Brush crust with 1 tablespoon butter; season with Italian seasoning and garlic powder. Remove pizza from skillet and let rest for 3 to 5 minutes before slicing.

This recipe is shared with:
Wednesdays Adorned From Above Blog Hop@Adorned From Above

Showcase Your Talent Thursday

Made U Look
Frugal Food Thursday @ Frugal Follies
Full Plate Thursday @ Miz Helens Country Cottage
Thursday's Treasures
Hookin Up with HoH@House of Hepworths
Frugal Food Thursday @ Frugal Follies
Full Plate Thursday @ Miz Helens Country Cottage
Spicy thursday Link Up@DC Instyle


Tuesday, March 26, 2013

Bolognese Sauce (Sunday Gravy)

On Sunday, if we're home and not running after our daughter's sports commitments, I like to make a really nice dinner.

Generally something I wouldn't make during the week, and that requires more thought and cooking time.

Stews, roasts, soups, and about once a month I make a big pot of "Sunday Gravy". In more general terms for those of you not of Italian descent, Spaghetti Sauce.

But this Sunday I leaned toward a tomato-ey Bolognese Sauce. Which means I made a meat sauce and also added in milk. There are probably a gazillion ways to make Spaghetti Sauce.

I typically use whatever I have on hand, mushrooms, carrots, onions, celery, garlic, peppers. And I mince these all in my food processor and them saute them in olive oil until they are softened.

So this time I took 3 Italian Turkey Sausages out of their casing and browned and crumbled it in a large heavy pot.

I then added all the minced vegetables and sauteed them.

Poured in a cup of red wine to de-glaze. 

Next I added two 28 oz. cans of whole tomatoes that I crushed with my hands-be careful they squirt everywhere sometimes.

Added 1 tsp of Oregano and Basil each and 2 bay leaves. Salt and pepper to taste.

Bring to a simmer and cover and cook for 1.5 hrs, stirring occasionally.

Add 1 cup of milk and cook on a low simmer with lid vented for another 30 minutes.

This is best served over a wide flat noodle, but feel free to use what pasta you like.


Ingredients:
  • 2 (28-ounce) cans whole tomatoes with juice or crushed tomatoes
  • 3 tablespoons olive oil
  • 1/4 pound ground pork
  • 1/4 pound ground beef chuck (or use Italian sausage out of the casing like I did in place of the meat)
  • 1 onion, finely chopped 
  • 2-3 cloves of garlic, finely chopped
  • 1 carrot, finely chopped
  • 8 oz. mushrooms, finely chopped
  • 1 bell pepper, finely chopped
  • 1 cup dry red wine
  • 1 cup milk
  • 1 teaspoon kosher salt
  • 1 teaspoon freshly ground black pepper
  • 1 pound flat pasta or short round like pappardelle, fettuccine, orecchiette or rotini.
Directions:
  1. Mince onions, carrots, garlic, mushrooms and pepper in a food processor until fine, set aside. 
  2. Break up tomatoes using your hands or a potato masher in a large bowl, set aside.
  3. In large, heavy pot over moderate heat, heat oil until hot but not smoking. 
  4. Add sausage or meat and sauté until golden brown, 5 to 6 minutes.  
  5. Add vegetables and sauté until they are tender, 5 to 6 minutes.
  6. Stir in red wine and simmer, scraping up browned bits stuck to bottom of pan, until liquid is reduced by half, about 5 minutes. 
  7. Stir in tomatoes, salt, and pepper. Reduce heat to moderately low and simmer, covered, stirring occasionally, until sauce is thickened and brick-red in color, approximately 1 hour, 30 minutes. 
  8. Add milk and simmer 20-30 minutes more, partially uncovered.
  9. In large pot of boiling salted water, cook pasta until almost tender. Drain well and toss with sauce. Serve with grated cheese.


This is shared with:
Trick or Treat Tuesday
Tuesday Talent Show
 Memories by the Mile
Tempt My Tummy Tuesdays @ Blessed with Grace
Tasty Tuesday Party @ Naptime Creations
Totally Tasty Tuesdays @ Mandy’s Recipe Box
Two Cup Tuesday @ Pint Sized Baker

Monday, March 25, 2013

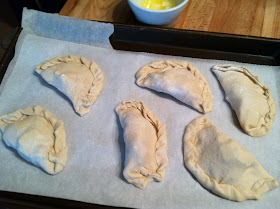
Ranch Ham & Cheese Mini Calzones

These babies are the bomb! For anyone who likes ranch, ham or cheese, this is the ticket.


And what took me so long to get on the frozen bread dough wagon? I mean not everything has to be from scratch, right?

Fade to an image of my mom giving me a horrified look, and wagging her finger back and forth at me.

Nah, come on. I have made tortillas but there are so many better ones out there that I can buy, and pretty cheap I might add, that I don't feel bad in the least. And no, I do not make all my own bread, mayo, peanut butter, soy sauce or butter.

So there, I feel better now.

I had frozen bread rolls in my freezer and I thought one day on my lunch hour, "I can take these out and thaw them and make mini Calzones tonight". I have found that if I don't think ahead like that, dinner may just be mac 'n cheese, and not necessarily out of that blue box. (I buy whatever brand is cheapest-since I don't eat it)

 I had seen something similar on The Pioneer Woman.

So, I had ham, cheese and decided to add a dollop of ranch. Ergo~~


These are so easy, but you do have to kinda prep a little in advance.
Like spray a baking dish and place those little frozen bread balls in it and cover with plastic wrap that you've sprayed also and set aside to thaw and rise slightly for about 4-5 hours. (or you could plan ahead better, unlike me, and do this the night before and put the dish in the frig).

When ready, slightly flour your board or counter and roll those babies out to about 6" circles. Heap some cut up deli ham and your favorite cheese (I used Meunster), and add a dollop of ranch dressing.


Fold each circle over and roll and pinch the two sides together to make a tight seal.
I brushed mine with a little melted butter, but you don't have to Oh just do it.

Pop them in a preheated 375F oven and bake for about 15 minutes or until golden brown and poofy.
Serve extra ranch dressing on the side for dipping. 
Now go buy that frozen bread dough!!
Recipe adapted from:The Pioneer Woman

Saturday, March 23, 2013

Liebster Award!!!

Well hello!!! I was nominated for a blogging award! How awesome is that?
A big thank you to The Non-Martha Momma !

"The Liebster Award is an award given to Bloggers by other Bloggers! That makes it even more special!”

Here are the Rules:
1.      Each blogger should post 11 random facts about themselves.
2.      Answer the questions the tagger has set for you, then create 11 new questions for the bloggers you pass the award to.
3.      Choose 11 new bloggers (with less than 200 followers) to pass the award to and link them in your post.
4.      Go back to their page and tell them about the award.
5.      No tag backs.


Here are my 11 random facts:
  1. I was born and raised in the San Francisco bay area.
  2. I lived in Pebble Beach for 5 years on a large estate-one of my life's regrets that I ever left. 
  3. I have 4 awesome children. 28, 26, 17 and 15. 
  4. I always dreamed of becoming a Doctor, but instead life steered me in the direction of accounting. Me, a bean-counter, never would have thought that. 
  5. I made a big leap and followed the light of My life to Northern Iowa, 20 years ago. 
  6. I have been a serious foodie and aspiring chef all my life. I almost cried when we got the Food Network on TV in our small town.   
  7. I could spend hours in a Trader Joe's or Whole foods. 
  8. All my kid's friends fight to be the one who stays for dinner.
  9. I was very athletic from a young age, but having the vision of a person wearing drunk goggles all my life blew that scenario. 
  10. I am humbled by how hard my husband works and how talented all my kids are. 
  11. I would eat sourdough bread and butter everyday, but I know that's not healthy ;).
My 11 Questions to Answer:
  1. Favorite vacation spot? Anywhere on the coast.
  2. What is your middle name? Susan
  3. Celebrity crush? Tom Selleck
  4. Favorite part of the weekend? Least favorite part of the weekend? Sleeping in. Sunday evening.
  5. Is this your 1st Liebester award?  Yes!
  6. Which side of the bed do you sleep on? The right, it's the furthest from the door.
  7. Do you smoke cigarettes or have you ever been a smoker? If you did smoke when and how did you quit? Yes, unfortunately I did and I do occasionally even now-stupid me.
  8. American Idol, The Voice, or X Factor....or none? The Voice!!!
  9. What were you like in high school? The tallest girl, athletic and smart. Three of the worst attractants you can have at that time.
  10. Scariest thing that has happened to you? Being diagnosed with breast cancer at 34, and them again at 41.
  11. Favorite late night snack? Popcorn. 


Friday, March 22, 2013

Green Chile Chicken Enchiladas

Okay, okay....I caved and I'm throwing my hat in with everyone else.


These are phenomenal, no wonder they are so hot on Pinterest and everywhere else.

This delicious version of enchiladas are not, I repeat, NOT, made with a condensed cream soup.
So, let's get your big girl panties on because this is an excellent opportunity to visit....

Kitchen Basics 101

Meaning, this recipe uses a basic Veloute Sauce. One of the 5 "mother" sauces a chef learns to make. It is basically a "white" sauce, cousin to a Bechamel, but it uses a clear stock instead. 

So in this case we are using chicken Stock or broth to make our "white" sauce.Adding in flavorful-not spicy green chiles and sour cream. Yum!

That and lots of cheesy goodness will make you shout   

Ole!

Ingredients:
10 soft flour tortillas-6" or Taco size
2 cups cooked, shredded chicken
2 cups shredded Monterey Jack cheese or a Cheddar/Jack Blend
1/2 tsp Chile Powder and Cumin (opt.)
3 Tbsp. butter
3 Tbsp. flour
2 cups chicken broth
1 cup sour cream
1 (4 oz) can diced green chiles

Directions:
  1.  Preheat oven to 375 degrees.  Grease a 9x11 casserole dish or pan
  2.  Mix chicken, 1 cup cheese and spices.  Roll up in tortillas and place in pan.
  3. In a sauce pan, melt butter, stir in flour and cook 1 minute.  Add broth and whisk until smooth. Heat over medium heat until thick and bubbly. Voila! Veloute Sauce!!!!
  4. Take the sauce off the heat and stir in sour cream and chilies.  (Do not bring to boil, you don't want curdled sour cream)
  5. Pour over enchiladas and top with remaining cheese. 
  6. Bake 25 minutes and then under high broil for 3 min to brown the cheese. 
After broiling let the dish set for about 5-10 minutes in order to make serving them easier. (I know that's hard to do; you want to devour eat them right away!!)


*This recipe is adapted from: Joyful Momma's Kitchen


Thursday, March 21, 2013

Easy Southwest Tamale Cups

So....I have been craving tamales lately.

I remember making them many times with my mom when I was still at home. I have attempted them myself on a couple occasions, but you really need "the village" to pull off this dish well.

But they're sooooooooo good. I love the polenta-like consistency of the tamal dough after it is steamed and then you get the wonderful goodness of what's been stuffed inside. All covered in a fragrant, tasty red chile sauce.

Yum!!

I figured out a way to make them... easy. I still think the traditional way of using corn husks is way superior, but this enables me to make tamales on a week night.

SNAP!!


@Salted Nuts

Now doesn't that look tasty? And it's all in a stuff your face with as many as you can  convenient portioned size.

It's made with a basic masa harina (corn flour) mix, formed in cups and filled with your favorite tamale ingredients and baked in a bain marie (water bath-baby!), so that the masa stays nice and creamy and puffs a little.

Ingredients:
2 cups masa harina-found in almost any grocery store in the International section.
3 tbsp oil
1/2 tsp cumin and garlic powder
pinch of salt
1 cup of warm water

2 cups of prepared Pinto or black beans
2 cups of red chile simmered pork, chicken, beef(optional)
1 cup of cheese
(see the beauty of this is you can use what ever you like: corn, green chiles, taco meat, shredded cooked chicken....)

Directions:
  1. Preheat oven to 375F. 
  2. Prepare the masa in a bowl adding in the oil, cumin, garlic powder, salt and warm water. Mix with your hands until you get the consistency of a slightly sticky dough (if too sticky add small amounts of regular flour. Cover, to rest and let the masa hydrate. 
  3. Meanwhile prepare six 6-8 oz. cups, like custard or baking cups and spray with non-stick spray and place in a baking pan or dish large enough to hold all of them. 
  4. Heat 3 cups of water to a boil. 
  5. Place about 2 tbsp of the beans in the each of the cups and cover with the red chile shredded pork. 
  6. Pour the water into the pan (not in the cups, around them) going to the side of the cups up to about an inch, cover the entire pan with foil. 
  7. Carefully place the pan in the oven and bake for 25-30 minutes. 
  8. Remove the foil and sprinkle the cheese over the cups and return to the oven for 8 minutes or until the cheese is melty and bubbly. 
  9. Serve. Careful!!! The cups are very hot, use tongs and or mitts.


Monday, March 18, 2013

Minestrone Soup

Well dang. That's what we get living in North Iowa.

Today I was supposed to take my two girls to a semi-annual dental appointment.

Didn't happen...North Iowa weather did. School was canceled before 6am. Blizzard warnings. It snowed and the winds kicked up to 40mph. So....good thing I had already planned to take the whole day off.

Bonus!! I had already planned to sleep in and now the whole day we are pretty much house bound.

Perfect opportunity to make a BIG pot of soup.

Minestrone, here we come.

We all love it. I get to clean out my frig using all the veggies I have and we get a hot, hearty, delicious soup.

@Salted Nuts
Minestrone Soup
 

Friday, March 15, 2013

Deviled Blarney Eggs

Today, at my workplace, we are having a potluck to celebrate St. Patrick's Day.

And of course, who doesn't love an excuse to graze at a Potluck?

Certain people like to bring certain things like their favorite dessert or meatball, so I graciously opted to bring Deviled eggs. 

Little do they know what they're getting......

@Salted Nuts
 Woo! those babies are green aren't they? 

But then, they are full of the Blarney of the Irish!

So easy to do too........

Ingredients:
10 Eggs-hardboiled, cooled and shelled 
1/3-1/2 cup Real Mayonnaise
Pinch of Salt
1/4 tsp pepper
1 tsp Prepared Mustard

Directions:
  1. Halve the eggs and place all the yolks in a separate bowl and set aside. 
  2. Fill a large bowl with 3 cups of room temp water and place 10-15 drops of food coloring in your desired color in the water. Stir. 2-3 tsp of white vinegar is optional. 
  3. Place all the egg white halves in the bowl and let set for 20-30 minutes. The longer they are in the solution the darker they get. So for a pastel color, shorten the time. 
  4. Drain the coloring solution and place the egg white halves on a paper towel lined baking sheet(I used a paper grocery bag). 
  5. Meanwhile, push the egg yolks through a fine sieve using the back of a large spoon and combine with the mayo, salt, pepper and mustard. Feel free to add minced Capers, pickles, Dill weed, etc. 
  6. Place this mixture in a freezer bag and refrigerate. 
  7. When ready to fill, snip off on corner of the bag, twist the top and "pipe" the egg mixture into each egg white half. 
  8. Tada!!! Deviled Eggs-Blarney style, heehee.  
 This Recipe is shared on:

Foodie Friday @ Designs by Gollum
Friday Favorites @ Simply Sweet Home
Foodie Friends Friday @ Busy Vegetarian Mom

 Kitchen Fun and Crafty Friday
What's Shakin'


  1.  

Thursday, March 14, 2013

Savory German Brat, Cabbage and Onion Supper

Growing up and living in the San Francisco Bay Area, I experienced many diverse ethnic foods. And I have to admit, I really loved them all!

See, I was born a Foodie and then I was raised in a great environment to explore it.

One thing that I have admit I never had the opportunity to try during my first 35 years was......

BRATWURST

Ya, ve're talking German brat-vurst, you know??

I know, hard to believe, but German food isn't quite the thing out on the West coast unless you get into a little German enclave, like Alpine Village in southern California. 

It is well known that the highest percentages of German settlements are concentrated in the Upper Midwest and over to Ohio. So....no wonder this Cali girl had never had a Brat!!

But, believe you me, I have made up for it in the last 20 years.
They are sooooo good!


Grilling Brats (sausages, not children!!!), is a weekly occurrence in these parts during the summer months. The favored way is to grill them and then simmer them in a pan on the BBQ that is filled with beer. Yup, I did say that....beer!

Served on a Brat Bun(yes-back here they have specific buns for Brats!) slathered with your favorite mustard. Sooooo goood!

During the winter, I still prepare Brats, the typical German way, with sauteed cabbage, carrots and onions. Still delicious. 


So that is what I have for you today......  


@Salted Nuts


This is more traditional with potatoes, but I omitted them because we have been eating a lot of them lately this dish didn't need it. Feel free to slice 2 potatoes and saute them along with the other vegetables. 


Ingredients 
4 tablespoons butter, divided
1 pound bratwurst-about 5-6 links
1 onion, chopped
2 large carrots, peeled, halved and sliced
4-5 cups green cabbage, roughly chopped about half a head)
2 tbsp apple cider vinegar
1 tsp sugar
Kosher salt and cracked black pepper

Directions
Melt 1 tbsp of butter over medium heat in a deep sided saute pan, and brown Brats on all sides. About 8-10 minutes. Remove to a plate and set aside.  


Melt the remaining 3 tbsp butter and add in all the vegetables. Season with salt and pepper and stir to coat. Cover and cook 8-10 minutes until wilted by half.   


Mix the sugar and vinegar and pour over the cabbage mixture and stir to combine. Nestle in the Brats and turn heat to medium low and cook covered until the Brats are heated through and the vegetables are softened completely, abut 20 minutes more. Vent the lid the last 10 minutes to evaporate some of the liquid from the vegetables. 
Serve with your favorite mustard.


Recipe adapted from Johnsonville

This recipe has been shared on:
Showcase Your Talent Thursday
Somewhat Simple
Thursday's Treasures
Made U Look

Frugal Food Thursday @ Frugal Follies
Full Plate Thursday @ Miz Helens Country Cottage


Wednesday, March 13, 2013

The Ultimate Cheesy Tater Broccoli Casserole

I'm still reeling from the scary drive we had this last Sunday. 

We left our home at 6am for a Volleyball Tournament with the youngest daughter, at the National Volleyball Center in Rochester, MN. It is 90 minutes away from where we live in North Iowa.

12 hours later, at 6pm, we left to return home and drove straight into a blizzard. For the first 2 hours we drove 35-40mph. The last 11 miles to our city is on a 2 lane country road, it took us 50 minutes, plowing through 5-8" snow and drifts. No lights other than our headlights and the wind was blowing snow straight across. Nerve-wracking doesn't even do that drive justice.

So now I am truly embracing all my grey hairs. I thought all my children gave them to me (and one ex-husband-hehe), but now I realize it's LIFE!!!

So comfort food has been at the top of everyone's list. Including the fact that I work full time and if I haven't utilized my handy-dandy slow cooker, then dinner isn't started 'til I get home at 5:05pm. (Yes, I'm fortunate, I work a mile away from home-small town girl now).  

So this casserole (Hotdish back here), came out fast, really tasty and CHEESY.

It has all the components that most love: Meat, potatoes, and cheese. It is so cheesy and delicious that not one word was said about the Broccoli, which was fantastic.

My family all voted to have this made in place of Tater Tot Hot-dish any day!!!
@SaltedNuts-of course I forgot the FF Onions in the pic

  Ingredients:
  • Tater Tots or Cubed Potatoes
  • 1 Pound Ground Beef, Pork, Chicken or Turkey (I used lean ground Pork)
  • 1 Sm. Onion, diced
  • 10 Ounces Frozen Broccoli, thawed
  • 1 Med.Tomato, chopped
  • 1 Cup Onions French Fried Divided
  • 1 1/2 Cups Sharp Cheddar Cheese Shredded
  • 10 3/4 Ounces Cream of Mushroom Soup Undiluted (sub your favorite cream soup)
  • 1/2 Cup Milk
  • 1/2 Teaspoon Garlic Powder
  • Salt
  • Pepper
Directions:
  1. Layer Tater Tots or cubed potatoes in bottom of a 13-in. x 9-in. x 2-in. baking pan. Bake at 400 degrees for 10-15 minutes. 
  2. Meanwhile, in a large skillet, brown beef; drain and saute onion until translucent. Add salt and pepper to taste.
  3. In a bowl, combine 1/2 cup cheese, soup, milk and garlic powder. 
  4. Spoon beef mixture over hot Tater Tots. 
  5. Spread broccoli over meat, then tomatoes and then pour the soup mixture over to cover all. 
  6. Cover with foil and bake 25-30 minutes. 
  7. Uncover and sprinkle with remaining cheese and french fried onions. Bake an additional 5 minutes or until cheese is melted.
  8. Let rest 5-10 minutes to make serving easier (if you can wait that long!).


**This recipe is adapted from a recipe by Ore-Ida.com


This recipe is featured on:
What's Cookin' Wednesday
Cast Party Wednesday @ Lady Behind the Curtain
What I Whipped Up Wednesday @ Sugar and Dots
Wiked Good Wednesday @ I Love My Disorganized Life
Whats Cooking Wednesday @ Buns in My Oven

Trick or Treat Tuesday
Tasteful Tuesday
Tuesday Talent Show
 Memories by the Mile

Melt In Your Mouth Monday@Make Ahead Meals For Busy Moms